I grew up during the glory days of the US space program. Born just a few years after we landed on the moon and coming of age during the heady heyday of the shuttle program, my childhood was marked by the changes to everyday life brought on by the technological advanced achieved as a result of our drive into space. My youth saw the an increased popularity of such scientific wonders as Tootsie rolls, Tang, and Teflon simply because they were associated with the astronauts. While Tootsie rolls have remained a unique feature in the US candy market, Tang launched a revolution in the beverage industry, giving rise to a whole subcategory of powdered drink mixes and opening the door for everything from Kool-Aid to Crystal Light. But it has been Teflon that has had the greatest impact, starting a chemical revolution and altering our home lives in ways we never could have predicted.
Teflon was trademarked in 1945 by a couple of chemists and was initially used to coat valves and bearings and seals where friction needed to be reduced. NASA used it on their heat shields and space suits, raising the profile of the product and its corporate owner DuPont. Since then, it has been used on a variety of common household items, most notably water-proof fabrics (like Gore-Tex), stain resistant carpeting and non-stick cookware.
The increasing presence of Teflon in our modern lives has had an unexpected consequence that has been making the news in recent weeks. It turns out that prolonged exposure to the chemical components in that non-stick coating result in an impaired immune system that does not respond to viral inoculations. The research that discovered this connection also discovered that these chemicals are now so widespread in our atmosphere that they can be found in the blood of polar bears. So, how does this happen?
For items like carpeting, every time you walk across the carpeted floor, you weaken the fibers and allow tiny particles to become airborne. You breathe them in, and they enter your bloodstream.
For items like non-stick cookware, the chemicals enter our system through our food. Here's something most people don't know - if you let your non-stick pans get too hot, the lining starts to break down, and the chemicals are leeched into the food you're cooking. Even worse is when you use metal utensils or stack your non-stick pans - you are scratching the finish and allowing particles to break off and enter your food.
So how did non-stick pans end up on the market anyway if they present this health risk? Here's another thing most people don't realize - they come with instructions. I am a fan of the stuff. I think there is a place for Teflon in the kitchen - think omelets, crepes, French toast. These are all items that should be cooked over fairly low heat and under close monitoring - perfect for a non-stick pan that will allow your food to slide nicely onto the plate. If you read the instructions on your non-stick cookware, the manufacturer has let you know that your pan should not be used for high-heat cooking. There's a different pan for that - cast iron or anodized aluminum.
If you use non-stick bakeware, stop. There's little control over how hot it gets once it's in that oven. If you don't want to grease your bakeware, use parchment paper.
Even if you are cooking at home, the best way to stay healthy is to know and understand what's in your kitchen - the ingredients you buy as well as the tools you use.
Teflon was trademarked in 1945 by a couple of chemists and was initially used to coat valves and bearings and seals where friction needed to be reduced. NASA used it on their heat shields and space suits, raising the profile of the product and its corporate owner DuPont. Since then, it has been used on a variety of common household items, most notably water-proof fabrics (like Gore-Tex), stain resistant carpeting and non-stick cookware.
The increasing presence of Teflon in our modern lives has had an unexpected consequence that has been making the news in recent weeks. It turns out that prolonged exposure to the chemical components in that non-stick coating result in an impaired immune system that does not respond to viral inoculations. The research that discovered this connection also discovered that these chemicals are now so widespread in our atmosphere that they can be found in the blood of polar bears. So, how does this happen?
For items like carpeting, every time you walk across the carpeted floor, you weaken the fibers and allow tiny particles to become airborne. You breathe them in, and they enter your bloodstream.
For items like non-stick cookware, the chemicals enter our system through our food. Here's something most people don't know - if you let your non-stick pans get too hot, the lining starts to break down, and the chemicals are leeched into the food you're cooking. Even worse is when you use metal utensils or stack your non-stick pans - you are scratching the finish and allowing particles to break off and enter your food.
So how did non-stick pans end up on the market anyway if they present this health risk? Here's another thing most people don't realize - they come with instructions. I am a fan of the stuff. I think there is a place for Teflon in the kitchen - think omelets, crepes, French toast. These are all items that should be cooked over fairly low heat and under close monitoring - perfect for a non-stick pan that will allow your food to slide nicely onto the plate. If you read the instructions on your non-stick cookware, the manufacturer has let you know that your pan should not be used for high-heat cooking. There's a different pan for that - cast iron or anodized aluminum.
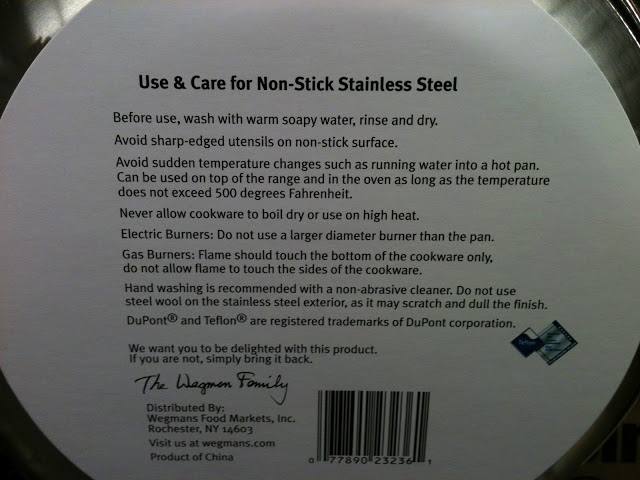 |
| Instructions on Wegman's non-stick frying pans |
If you use non-stick bakeware, stop. There's little control over how hot it gets once it's in that oven. If you don't want to grease your bakeware, use parchment paper.
Even if you are cooking at home, the best way to stay healthy is to know and understand what's in your kitchen - the ingredients you buy as well as the tools you use.